It is difficult to disagree with the fact that communications in the bathroom are not the most pleasant sight. No matter how expensive the pipes with valves are, they can only decorate a specific interior such as a loft. If you are not a fan of industrial design, then there is a strong desire to hide these networks, right?
We suggest considering several options for closing the pipes in the toilet, leaving access for regular and emergency maintenance. The article describes in detail the technical nuances and ways of implementing interesting ideas. The text is supplemented by useful visual applications and video tutorials.
Pipe layouts in the toilet
The issue of masking pipes concerns both budget housing and luxury apartments. The difference lies in the methods of terminating communications, which are largely determined by the pipe layout.
If in a 15-meter combined bathroom there is an opportunity to sew up all the walls with false panels, then every centimeter is important on a 2 m² patch. Often after repair, the interior of the toilet often acquires inconceivable forms.
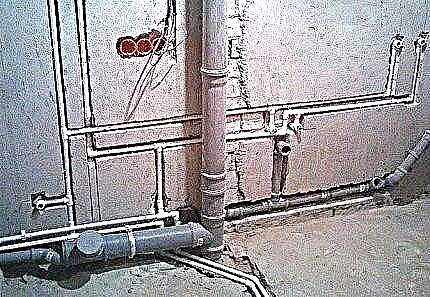
In typical housing, everything is simple: in the corner of the room there is a common sewer riser, parallel to it pipes of centralized water supply are installed. Intra-apartment communications from pipes of smaller diameter are connected to them. Thus, a vertical riser and horizontally laid branches need camouflage.

The simplest arrangement of sewer pipes and water in the toilet. The best option for hiding communications is the construction of two baskets (along the riser and behind the toilet), occupying a minimum of usable space
Difficulties arise when, instead of a pair of branches, you have to hide water meters that require regular access, filters, collectors, etc.
Simple boxes are not enough, you have to attach partitions to the supporting walls or build structures that resemble screens.

The collector, counters and filters are located above the toilet and occupy almost the entire wall opposite the entrance to the toilet. The best way to close wiring and appliances is to build a plumbing cabinet with wide doors or use blinds
In a private house, everything is easier if you take care of the disguise of communications before the project is put into practice. Part of the pipes can be hidden in the walls, and for important nodes create technical hatches. Filters and metering devices are installed in a specially designated room - together with a pump and other equipment responsible for water supply at home.
In high-rise buildings, no one will allow to destroy walls under pipes, and the characteristics of the walls are not suitable for destruction, even partial. There is an external decor, the options of which we will get to know better.
Communication masking methods
The choice of method depends on several factors: the size and direction of the pipelines, their location relative to each other, the availability of additional devices, etc.
How to hide sewer and water pipes in the toilet is also influenced by the features of interior design. For example, blinds are not very combined with the classics, but they are suitable for minimalism. The choice remains with the homeowners, and a description of the methods for masking pipes is below.
# 1: Box made of plastic panels
Despite some difficulties in the construction of structures on the frame, even beginners can safely undertake the construction of the box. Their solution is understandable: saving the family budget and the availability of photo and video installation instructions.
What is the difference between drywall and plastic boxes? The difference is fundamental: in the first case, you create the basis for further decoration, in the second - you get the finished product immediately. Therefore, creating a box of plastic panels is easier, cheaper and faster.
However, this is only possible if the walls in the toilet are also lined with plastic of the same type or, in extreme cases, painted in the color of the panels.

One of the good options for using plastic is nothing more. All walls are completely lined with white plastic panels, while instead of the ducts that cover the pipes, a false wall with a hatch for communication service was erected
Installation instructions for plastic box:
- Testing the performance of communications. It is necessary in order to provide for pipe repair, which is usually accompanied by a structural analysis. The main task is to check the connections, nodes, operability of devices.
- Wall and ceiling treatment. It is produced with an antiseptic solution to prevent the appearance of black mold and fungus. An enclosed space with high humidity and insufficient ventilation is a risk zone.
- Create a crate. It is carried out on all walls or in areas of passage of communications. If you need a box to mask the riser - the construction of the frame. For this, both wooden battens (bars) and a metal profile designed for drywall are suitable.
- Installation of plastic panels. The set of parts is fast, the main thing is to fix each in its place. For fastening use small nails. Small gaps at the joints and in the corners can be covered with special decorative strips or inserts.
For decor, it is better to purchase a finished model of a plumbing hatch. It is advisable to install a larger model so that it is more convenient to service the devices.
If you plan to install the holder for toilet paper, at the stage of construction of the frame, you need to attach a mortgage - a wooden block.
# 2: Drywall construction on the frame
The first stage is preparatory. Materials must be purchased in advance, and a tool for work should be selected.
For trimming the metal profile, scissors for metal will be required, for cutting wooden parts - a hacksaw or jigsaw. A hammer and screwdriver is also needed to fix the details on the wall with dowels and self-tapping screws. Wood processing is carried out with a brush.
Mandatory elements for the construction of the structure:
Image Gallery
Photo from
Wireframe Parts
Tool for processing wooden parts
Sheet of moisture-proof drywall for plating
Self-tapping screws for joining metal parts
It is better to process all wooden blanks (bars, mortgages, plywood) before starting work, so that the protective composition is absorbed and dried. You can cut the details later, because after the construction of the frame, adjustment is often required, and a difference of even 1-2 mm is noticeable.
Next, proceed as follows:
Image Gallery
Photo from
With the help of a laser level, a square and a pencil, we mark the fastening lines of the guides. If a tile is chosen as a decorative coating, then it is necessary to take into account its dimensions (for example, 4 whole tiles with a width of 20 cm - this is 80 cm + 2.5 cm for seams)
We cut the metal profile into segments of the same length (equal to the height of the ceiling) using scissors for metal. 3 pieces are required: we fix 2 guides on the wall, one will be the outer corner
For fastening to the walls we use dowels and screws. It is important to make sure that the end comes out at an angle of exactly 90 °, and the rest of the guides (including the cross-beams at the ceiling and floor) are firmly fixed
The installation of mortgages from the timber is necessary so that sheets of plywood and drywall can be attached to the guides, as well as to fix the hatch. The bars processed by Neomid are inserted into the profile: the bar 45 mm x 45 mm is just suitable for installation in the profile 60 mm x 27 mm
To install an invisible hatch on racks, we fix the transverse crossbars with mortgages so that a rectangle forms. We insert the hatch and fix the frame to the mortgages for wood screws. For a water outlet we also fix a wooden mortgage, but much lower
Plywood is necessary to increase the rigidity of drywall, since a side-shelf will adjoin the side of the box, which must be hung at one end to the end. If you do not plan to install additional structures, you can do without plywood
Cut the pieces along the width of the end and fix them on plywood with screws. To prevent the edges of the drywall sheet from crumbling, we clean them with sandpaper. Sheathing is easier to sheathe, since it has neither a hatch, nor holes for pipes or adapters
We assemble the box from pieces of various widths, since the invisible hatch occupies the central part of the structure. Place fastening screws and seams putty putty. At the bottom, cut holes for the corrugation for the toilet and eyeliner for the tank
Step 1 - marking the floor and walls around the pipes
Step 2 - Prepare Guides and Connection Planks
Step 3 - securing the guides along the riser
Step 4 - Installing Mortgages in the Profile
Step 5 - installing the plumbing hatch
Step 6 - fixing the plywood sheet to the end of the box
Step 7 - cladding the end part with drywall
Step 8 - covering the front of the box
For any type of further finishing, drywall must be primed. As a decorative cladding, the same tiles are most often used as for finishing the entire toilet.
If you do everything carefully, the design will be durable, and the hatch is almost invisible. Instead of tiles, sometimes plastic panels or painting are used.
The general rule is relevant: before you hide the pipes in the box in the toilet, you need to check all the connections for leaks.
# 3: Built-in sanitary cabinet
A plumbing or utility cabinet is a wall-mounted design behind the toilet, through the doors of which you can easily get to counters, filters, manifolds and pipelines.
With a sufficient amount of free space, in addition to plumbing fixtures and pipes, convenient shelves for cleaning and hygiene products can be located behind the doors.

Beautiful glass doors covering the entire wall in width give access to the plumbing and ventilation unit, which is located at the top of the wall
The material for the manufacture of doors can be chosen independently.
Most popular options:
- wooden slats;
- plywood;
- plastic panels;
- chipboard or MDF boards;
- metal doors;
- glass.
When choosing, they are guided by the style of the interior as a whole. For example, in a wooden house, any models that somehow contain wood are appropriate, but preferably from processed natural wood. In the city toilet, sheathed with plastic, the doors of the same plastic will be less noticeable.

Given the aesthetic component, one should not forget about the basic conveniences of use: position the doors at a suitable height, opposite the important plumbing units, screw on comfortable handles
The swing doors of the sanitary cabinet are mounted on the same principle as any doors: they are hung from the base frame by hinges.
There are other types of doors: accordions and sliding models that move to the sides. But there is a big difference between them: for the accordion you do not need additional space, and for the sliding structure, typical separate toilets simply are not suitable due to the lack of free space.
# 4: Blinds or shutters in decoration
The main advantage of blinds is the preservation of free space in a small area. Unlike doors or a hatch, they absolutely do not interfere in the open. The usual plastic blinds are not expensive, but beautifully designed wood or metal options are more expensive.
Plastic is a universal material: it is easy to care for, easy to install. But it is not suitable for an elegant interior. Metal models are stronger, have better sound insulation.
It is better not to consider fabric offers, since textiles are not the most suitable option for a room with high humidity, requiring constant cleaning.
In addition to the material of the lamellas, the hardware is also important:
- Chains
- binding threads;
- lifting gear.
High-quality parts are a guarantee of a long service of a sanitary screen without repair and replacement.

Roller shutters and blinds have a similar mechanism: when you open the slats (slats), they rise up and twist into a roll inside a metal or plastic box
Roller shutters are a more reliable and solid construction, but they do not correspond much to the area and interior of standard bathrooms. If the footage allows, then you can install them. Pay attention to the automatic models that open easily with the remote control.
Hidden installation - gating
In addition to decorative facing options for masking pipes, there is also an “internal” installation of wiring in the toilet in specially punched strobes. With the help of a chamfer, a puncher or a door, special grooves are cut out at the places where the pipes are laid, where the water and sewer branches are hidden.
The sewer riser has a large diameter (100-110 mm), so it is not sewn into the walls, but the cold water and hot water pipes are easily placed in the gates
In case of concealed installation, preference is given to straight sections of the pipeline with indivisible or conditionally detachable joints and units. The "invisible" installation has two main advantages: the lack of plumbing parts, the appearance of which does not correspond to the beautiful wall cladding, and space saving.
There are a number of rules prescribed in regulatory documents that sharply limit the use of gating:
- it is impossible to lay strobes in the bearing walls;
- for flush mounting only pipes connected by one-piece, monolithic technology (soldered) are suitable, access to other types is necessary;
- the gating zone should be free from power supply networks;
- when choosing the width of the strobe, it is necessary to take into account the linear expansion of the material (for example, polypropylene expands in all directions);
- clamps are used for installation, so that the pipes do not make sounds when touching the walls; thermal insulation material is sometimes used.
Experienced plumbers recommend storing a hidden wiring diagram, as it can come in handy during major or emergency repairs. Before you sew and pipe pipes in the toilet, we recommend that you make a detailed drawing.
Outdoor communications
Is pipe masking always required? They are left in sight in the only case: if they are outwardly attractive and themselves carry some kind of aesthetic burden. For example, copper pipes, along with plumbing fixtures from a similar material, are often an element of decor.

External pipelines made of copper (less often steel or cast iron) adorn the interiors of bathrooms decorated in modern industrial styles - loft, techno, hi-tech
Installing an external pipeline, as well as repairs, is straightforward. All parts and connections are visible and therefore easy to replace or strengthen if necessary. As part of the decor, they require constant care.
The big minus of metal external pipelines is the high cost. Another inconvenience is the risk of burns from a hot pipe.
If you have questions about the installation of plumbing boxes or cabinets, it is best to seek the advice and advice of professionals.
Overview of the closet (hatch) in the toilet:
Installation of blinds:
Pipe box - quickly and economically:
To hide water or sewer pipes in the bathroom, consider all factors: the size of the room, the location of the pipeline and riser, the availability of additional devices.
Perhaps the best way to camouflage would be a false wall with doors or a plasterboard box with a hatch - it all depends on the specific conditions.
Share with your readers your experience of masking communications in the bathroom. Please leave comments on the article and ask your questions. The feedback form is located below.