Any plumbing should work well, and this is an axiom. If the toilet tank leaks, but the water doesn’t fall on the floor, the breakdown does not create any particular problems until the time comes for paying utility bills.
Leaks are too expensive, so they should be fixed immediately after the appearance. It is not necessary to call plumbers, everything can be done with your own hands if you understand in detail the cause of the breakdown and how to fix it. What we will do in this article, having examined the device and the principle of operation of the drain tank.
We will also analyze in detail the popular types of breakdowns, as a result of which the tank leaks, and provide recommendations for repairs.
How does the drain tank work?
To fix the drain tank, you should understand its design and principle of operation, methods for diagnosing problems. It consists of several parts: body, float and drain valves, overflow, drain lever.
A float (bulk) valve controls the water level in the tank. When the water leaves, the valve pulls the shut-off part down, thereby opening the fitting. Gradually, the tank is filled with water, and the float valve rises and blocks its access.

In many respects, the service life of the tank’s intake valves depends on the type of shut-off valve. It can be piston (rod) or membrane. Each of them has its own advantages and disadvantages: membrane ones are more convenient in operation, and piston ones are more durable
The overflow function is to protect the tank from overflow. The part is a hollow column into which water is drawn. As soon as it rises to the upper edge of the column, it begins to drain into the toilet bowl.
The drain valve closes the drain hole so that the tank is filled with water. When the hatch opens, it flows into the toilet. The valve is controlled by a drain lever. This is a multi-component node resembling a rocker. Pressing on its free edge leads to the opening of the hatch. If you release the lever, the sunroof lowers again. In more detail, the device of the shut-off and inlet valve for the toilet we examined in this article.
The flushing mechanism can be made in the form of a button or lever, and it is located on the side or top. In modern toilet models, leverage is rarely used. If it is, then it can be activated by pulling the chain. If the drain mechanism is activated using the button, then it is placed on top - right in the center of the tank cap.

The operation of the drain fittings of the toilet bowl is controlled by levers, handles, conventional or pneumatic buttons, which are located in a convenient place for use
Malfunctions in the operation of the valve, overflow and valve lead to leaks, therefore, they should be checked first of all in order to establish the cause of the leak.
Image Gallery
Photo from
Diagnosis of the causes of leakage of the toilet bowl
Studying the condition of tank fittings
Leakage due to seal bias
Replacing valves in case of serious damage
Ways to eliminate various types of leaks
There are several main types of leaks:
- Water does not linger in the tank. If the float valve does not hold water in the tank, it constantly drains into the toilet. This may be accompanied by noise. Such a breakdown leads to increased water consumption.
- Water flows from the drain tank to the floor. Such a leak usually appears between the tank and the bowl. A puddle forms on the toilet floor. Water accumulates and begins to flow to the neighbors below.
- Water flows when it is typed into the tank or drained into the toilet bowl. This leak is not constant, it is detected at the moment of water collection in the tank or drain. Most often, a leak indicates a malfunction of the drain mechanism.
The repair method depends on the type of leak. To determine which part is faulty, shut off the water, partially or completely disassemble the toilet flush tank and inspect the mechanisms.

Most often on sale you can find models with side water supply. In them, the fittings are located on top, which is convenient for repair. The only drawback of such models is the noise when typing water
It’s best to prepare in advance tools that can come in handy: gloves, wire cutters, pliers. Before starting the inspection of the tank, do not drain the water, as in some cases, it is needed for accurate diagnosis of damage.
Option # 1 - eliminate leaks from the tank into the toilet
If the toilet bowl is constantly flowing and water is poorly drawn into it, there is probably a problem with the drain mechanism. It is either corrupted, or some details have shifted in it. Shut off the water supply and remove the lid from the tank container to gain access to the mechanism.
First of all, check the location of the float: it should be even, and the part itself should move freely. It often happens that the usual displacement of the float leads to a constant flow of water, because the drain hole is not completely blocked.
In this case, it is enough to put the float back in place by bending the spoke or adjusting the height of the part using the toothed bar, and the problem will be solved.
The float may shift for several reasons: due to natural wear, due to initial poor adjustment, or under the influence of water shocks when the pressure changes
Make sure that no water enters the float. If you find excess fluid in it, carefully remove the part, pour out the water and find the crack through which it entered. Sometimes soldering irons are used for this, but it is most convenient to eliminate leaks with the help of plumbing sealant.
Clean, dry and degrease the surface of the float at the crack site, then apply sealant in a continuous line. After 5 minutes, even the seam with a finger in a wet glove or with a special soft spatula.
If during operation the composition gets on other surfaces, it must be removed immediately. To do this, a wet rag or napkin is suitable. After 20 minutes, the repaired part can be replaced.

Normally, the float is always on the surface of the water. If it sinks, this indicates a leak: somewhere a crack has formed, through which water flows. Leakage may occur due to wear or mechanical damage to the part.
In some cases, it makes sense to simply replace the float valve. You can buy a new one at a hardware or hardware store. Repair is simple: unscrew the fasteners, remove the old float, install a new one in its place and tightly fix it with the old fasteners. We recommend that you read the instructions for adjusting and replacing the float.
The main thing is to choose a part of the same class as the old one. Floats can be designed for strong, weak or medium water pressure. If you make a mistake when choosing, it will not be possible to ensure the normal operation of the float, even if it is in good condition, because he will not be able to close the drain hole tightly.
Most often, repair or replacement of the float solves the problem of leakage of this type, but there are more complex breakdowns. If you can’t cope on your own, contact a professional plumber for help.
Option # 2 - eliminate the leak between the tank and the bowl
If the design of the toilet involves direct connection of the tank to the bowl, a leak may occur at the connection of the elements.
This happens for several reasons:
- loose tank mounts;
- gasket wear;
- malfunction of a connecting cuff;
- mechanical damage to the drain tank;
- cracks or defects in the toilet shelf.
The first step is to check the strength of the tank mount. If the bolts are unscrewed, they must be tightened with an adjustable wrench. Twist tight, but carefully so as not to break the thread, otherwise you will have to buy new fasteners. Often this is enough to fix the leak. If not, check the cuff and gaskets.

When reassembling the toilet bowl, tighten the nuts very carefully. This is best done with your hands, not with a wrench. The joints can be additionally sealed with sealant
If the connecting cuff is damaged, it is quite easy to diagnose. You need to take a dry napkin or piece of toilet paper and draw on it. Places where wet traces remain are damaged. As a temporary measure, they can be sealed with construction tape. To solve the problem, you should either replace the cuff or put on a special clamp.
If the cuff is very worn out and longitudinal cracks appear on it, repair is a meaningless event, because new leaks quickly form. The part should be replaced. If the connection to the drain tank is rigid, you need to disconnect the float valve, unscrew the screws that secure the shelf, remove the tank cover.
The cuff must be removed from the neck of the toilet. If it does not work out, you will have to either cut it off or remove the entire tank. You can cut the cuff only if you are sure that you will not use it anymore. Having removed the tank with the cuff, it should be turned upside down and replace the part. To put on a new cuff on a branch pipe it is necessary that party at which smaller diameter.
About a third of the length of the cuff should be located on the nozzle, and two-thirds should be on the neck and in the gap between the parts. The neck of the toilet should be tightly covered by the cuff.
After replacing the part, it remains only to put the tank in place, connect the float valve and tighten the screws. Try not to overtighten the nuts so as not to damage the parts of the plumbing.

The cuff is an element whose function is the hermetic connection of the pipe to the toilet. It can be straight or with an eccentric
If the float valve is connected with a flexible connector, it is not necessary to disconnect it when replacing the cuff. It is enough to unscrew the screws and pull them out of the holes, remove the old part and carefully put on a new one. In this case, you need to raise the tank, so it is advisable to perform this operation together.
If the gaskets are worn out, they cannot be repaired; you will have to change them. They constantly come into contact with water, withstand heavy loads, so over time they lose their elasticity and cease to provide tight joints.
First, remove the tank cap, after which the mechanisms are disassembled to get to the gasket. Old parts are removed, and new ones are installed in their place, after which everything is assembled in the reverse order. We advise you to see detailed instructions for selecting and replacing gaskets.

The toilet flush tank can be built into a niche, mounted on the wall or on the toilet itself. The last location option is the most common and convenient, since access for inspection and repair remains free.
Sometimes the cause of leaks are cracks and mechanical damage on the toilet shelf or in the drain tank. If such defects have appeared, it's time to think about buying a new plumbing fixture. As a temporary measure, cracks can be repaired with a special moisture-resistant adhesive for ceramic materials.
Option # 3 - solve the problem of irregular leaks
It happens that leaks are inconsistent and appear only at certain periods. Such leaks have little effect on overall water consumption, but cause some discomfort. We will figure out what to do if the toilet bowl leaks when water is drawn or at the time of discharge.
If, when you press the water release button, you find water seeping, this means that the drain mechanism is faulty and needs to be repaired. First, check the lock of the shut-off valve. Remove the lid from the container and press the valve. If this stops the leakage instantly, then replace the gasket and make sure it is tight.
If the cause of the leak is not related to the gasket, check the nut with which the tank is attached to the pipe or shelf. Loosened fasteners simply pull up, and if the thread is broken - replace the nut.

Gaskets can vary greatly in size and shape. In order not to make a mistake when replacing, remove the old part and buy exactly the same. When buying, make sure that the new gasket has not dried out and retained elasticity, otherwise it will not last long
Leakage may occur due to the displacement of the drain button. If it gets stuck, it interferes with the valve, and the valve does not close the drain hole. In this case, the button is simply corrected, returning to its intended place - strictly in the center.
Sometimes a problem occurs because the button breaks. It should be replaced. For installation, you can use universal plumbing fixtures, which is suitable for almost all models and is in any hardware store.
If you have a different type of breakdown, which we did not consider in this article, we recommend that you search for typical tank malfunctions.
Instructions for replacing filling fittings
A complete replacement of the fittings is needed if it is found that the fasteners are broken or the parts are very worn. The toilet itself can last 10-20 years, but problems with fittings occur more often. Depending on the quality of the materials and the operating mode, it has to be changed approximately every 5-10 years.
For work you will need:
- new set of fittings;
- measuring instruments (tape measure or ruler);
- a pair of adjustable wrenches;
- spanners of suitable diameter.
Do not forget rags or cleaning wipes in case of water leakage.

To choose the right fittings, remove the old one and go with it to the hardware or construction store. If you find it difficult to navigate yourself, do not hesitate to connect a sales consultant. He will help you find a new kit that fits perfectly in place of the old
Water enters the tank either from the side or from below, and the complexity of connecting the fittings depends on this. Repairing tanks with a lower connection is complicated by the fact that the toilet and all plumbing elements are too close to the wall. Some difficulties may arise in replacing the intake fittings due to the small space. The technology itself and the sequence of work do not change from this.
First of all, the diameter of the supply pipes is determined. It is usually 10 or 15 cm (1/2 or 3/8 inch). You can measure the inner diameter using a tape measure or ruler. Measure the pipe itself or the distance between the faces of the nut holding the flexible hose. The figures obtained are guided by the purchase of new fittings.
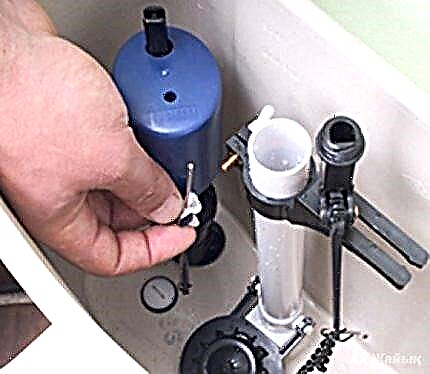
Before starting the installation of water intake fittings, shut off the water supply and lower the one that is already in the toilet. Then they remove the lid and get to work: holding the armature with one hand, you need to unscrew it with a wrench and remove the nut that holds it.
Sometimes it is not possible to hold the arm by hand, as the nut is too tight. Then you can hold it with a second wrench or a convenient grip from improvised means. In some cases, it is necessary to shorten the wrench by cutting off the part with a grinder or other suitable tool.

When the old fittings are removed, inspect the gasket. If it cracked, became hard and inflexible, it makes sense to immediately replace it
After checking the gasket, install the new valve so that there is a distance between it and the walls of the tank of the drain tank. It remains only to connect the water and make sure the installation is correct.
If you need to adjust the position of the parts, this can be done by adjusting the position of the float or tightening the nut of the diaphragm valve. Valves with a stem valve will have to be adjusted a little longer. Valves setting rules are discussed in the next article.
How and how can I seal a crack in a tank?
Most often, toilets and bathrooms are cramped rooms where you have to place a lot of appliances and necessary items. If something heavy falls on the tank, it may crack and leak. The same thing can happen in case of shock, sudden temperature drop or due to improper installation.
For sealing cracks in ceramic and plastic tanks, universal moisture-resistant adhesives, plumbing sealants and even cold welding are used.
The most reliable option is a two-component epoxy resin. When choosing a composition, it is important to make sure that there is a mark on the packaging that indicates its moisture resistance.

The appearance of a crack does not mean that you should urgently buy a new toilet. Damage can be repaired and a few months or even years to use the device
Work order:
- Dry the surface thoroughly: remove water droplets with a rag, and remove any remaining moisture with a fan or hairdryer. Degrease with gasoline or acetone.
- In a small container, mix the resin and hardener, or prepare another adhesive for use.
- Apply the composition to the surface. If possible, fix the damaged area (for example, with tape on the other side of the tank). Leave to dry completely.
When working with adhesives, pay attention to the manufacturer's recommendations regarding the temperature regime, safety measures, and pour time of the compositions.
When the adhesive composition hardens, it remains only to gently grind the seam with sandpaper (M20, M40 is suitable), and then with a piece of felt.

Do not ignore the step of grinding the seam. This is necessary not only to maintain a decent appearance, but also for greater hygiene, because more dirt accumulates on uneven surfaces
Have you encountered a breakdown of the flush tank of the hanging toilet? The analysis of breakdowns is described in detail in our article: Repair of the installation for the toilet: possible malfunctions and methods for their elimination.
There are many models of drain tanks. Outwardly, they can be very different from each other, but the internal device is approximately the same. Check out helpful videos to make repairs easier.
Detailed video tutorial on how to eliminate water leakage from the tank into the toilet:
Step-by-step instructions for replacing gaskets:
Guidelines for replacing intake valves:
Almost any leakage of the toilet bowl can be handled independently. But if the breakdown is serious, and you do not have the skills to handle tools or are afraid to damage the expensive toilet model, call the plumber. Paying for a specialist will be much cheaper than buying new equipment.
Understanding the cause of a breakdown that caused a leak in the toilet bowl? Maybe you have questions that you could not find the answer in the above material? Ask them in the block under the article - our experts will try to help you.
Or maybe you are professionally engaged in repairing toilet bowl tanks and want to share practical recommendations and personal secrets? Leave your opinion, add tips in the comments.